How does the CTE aiming system work for the people who can use it effectively?
First of all, “aiming systems” like CTE offer advantages to some people as a result of the factors outlined on the tangible benefits of “aiming systems” resource page.
If you are good at judging the type of cut, of the different versions of CTE, version 4 (Pro One) will generally work better than the others (without conscious or subconscious “adjustment”) because it involves a larger number of pre-pivot alignments, which will offer better coverage over a wide range of cut angles (with a consistent pivot). Also, because there is less pivot than with the other versions, there will be less variation in results with different bridge lengths and CB-OB distances (see more info below).
If you follow any of the CTE aiming procedures literally and exactly (without conscious or subconscious “adjustment” and with a consistent and non-variable pivot), you will make shots within certain limited ranges of cut angles and CB-OB distances for each resulting line of aim (see limited lines or alignments of aim). However, if you don’t vary the alignment or pivot (see more below), you will miss shots outside of and between these ranges, unless the OB is close to the pocket or the pockets are large (providing a large margin for error). However, even if a person is not good at judging or “adjusting” between the alignments or by using a variable pivot, CTE still might be beneficial for any of the many possible reasons summarized here.
Many “challenges” relating to “aiming systems” are described and illustrated in “Fundamentals – Part III: DAM aiming system” (BD, November, 2008) and “Fundamentals – Part IV: bridge length” (BD, December, 2008). These difficulties certainly apply to CTE. Here’s a good experiment you can use to test whether or not you understand how to apply CTE (or any pivot-based aiming method) effectively:
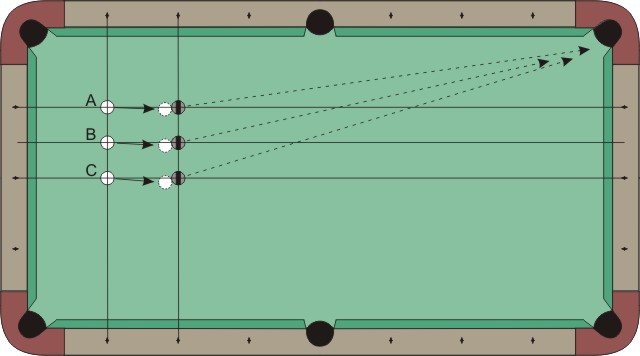
Shot “A” is about a 10° cut, shot “B” is about a 15° cut, and shot “C” is about a 20° cut. All three shots fit into the “thick cut” category of some versions of CTE. Also, the CB-to-OB distance is the same for all three shots. If the bridge length and pivot amount is the same for all three shots, a pertinent question is: What do you do differently with the alignment and/or pivot steps of CTE to pocket each of the three shots? There are several possible answers. You can:
- Change the initial alignment slightly (e.g., by shifting your eye alignment so the perceived cue alignment and/or parallel shift is different)
or - Change the amount of the parallel shift (before the pivot) so you don’t quite go all of the way to the perceived CB edge (e.g., shift a given number of “tips” instead)
or - Pivot a slightly different amount (e.g., not quite to center, or just past center).
or - Change the “effective pivot length” slightly (e.g., by adjusting your bridge length or by shifting/tilting your bridge during the pivot).
Options 1 and 4 are probably the most common approaches. The diagram below (from “Fundamentals – Part IV: bridge length” – BD, December, 2008) shows how a change in “effective pivot length” changes the amount of cut. The diagram shows two different bridge positions, but it could also represent two different “effective cue-pivot-points” created by a non-rigid-bridge pivot method (see more below).
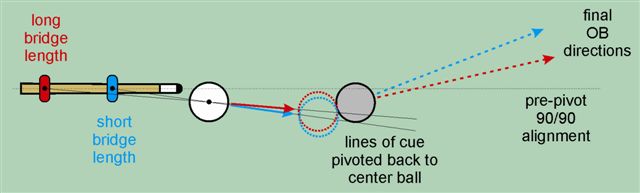
If using a “mechanical pivot” (i.e., pivoting after placing the bridge hand down), one way to vary the “effective pivot length” is to vary the bridge length (as implied by the diagram). Another is to shift, rotate, tilt, or deform your bridge hand during the pivot as you shift your body (AKA “hip pivot”). Here are examples of this, posted by Colin Colenso, where the “effective pivot length” is changed with a bridge shift:
Another way is to use an “air pivot,” where you pivot the cue and/or entire body before placing the bridge hand down. In this case, you can easily create any “effective pivot length” over an extremely wide range. Sometimes, the “effective pivot length” is referred to as the “shot arc.” Here is a demonstration of how some forms of pivoting are used in conjunction with CTE and other pivot-based aiming methods: CTE pivot demonstration. For more info concerning pivoting, “air pivot,” and “shot arc,” see Spidey’s blog.
The difficulty is in judging how much to change the initial alignment or “effective pivot length” to pocket balls requiring similar, but slightly different, amounts of cut. Many of the CTE proponents will say you don’t need to know where the pocket is, or take into consideration the necessary amount of cut (other than to judge a “thin hit” vs. a “thick hit”), but this obviously cannot be the case. Maybe people who seem to use CTE effectively must at least sense where the pocket is (even if they don’t look at it), or maybe they just have a feel for how much cut they need to pocket the ball. This sense or feel could influence their alignment or “pivot” in intangible ways that are difficult to describe or illustrate.
With all pivot-based aiming methods, the choice for “effective pivot length” must vary with the distance between the CB and OB, as illustrated by the following diagram from “Fundamentals – Part III: DAM aiming system” (BD, November, 2008). Note – the purpose for this diagram is simply to illustrate a general principle pertinent to all align-and-pivot systems like CTE and 90/90. The diagram is not meant to show a specific aiming example for any particular system or shot. The pre-pivot alignment shown is actually a 90/90 edge-to-edge (ETE) alignment, but again, this choice is not important for the point being made. With a fixed alignment (whatever alignment that might be) and a fixed “effective pivot length,” the distance between the CB and OB has a huge effect on the resulting cut angle of the shot:
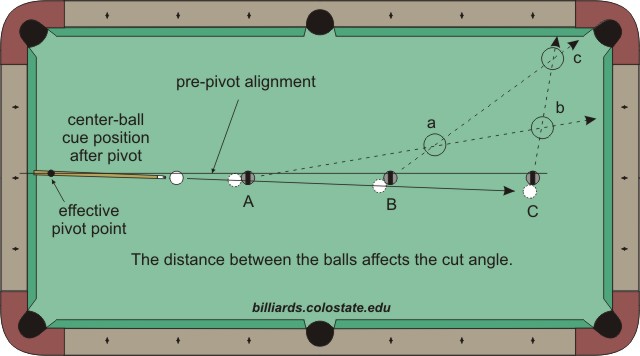
Interestingly, with the exact same initial alignment and pivot, two of the three balls can be potted if the pocket happens to be at points “a,” “b,” or “c.” This would actually be a good proposition shot. Approach somebody who doubts pivot-based aiming systems and bet him or her you can make two radically different shots (e.g., shots “A” and “B” in the diagram) with the exact same initial alignment and the exact same pivot. You can even have the doubter shoot the shots for you, as long as his alignment and stroke skills are reasonably good. If the balls are lined up to take advantage of the effect shown in the diagram (i.e., if the balls are lined up so the corner pocket is at point “a” relative to the balls), both shots will go and you will win the bet.
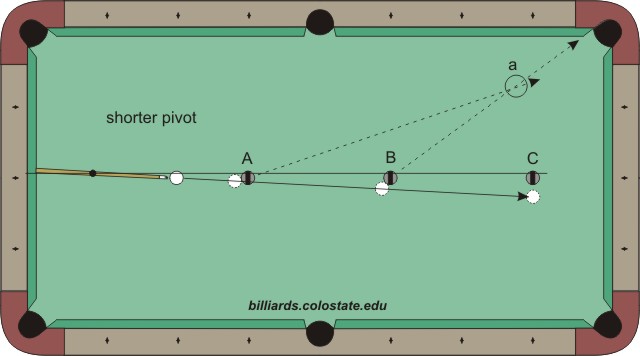
The diagram above begs the following question: Is there a pivot length that would allow all three balls to be sent to the same position (e.g., where a pocket is located)? Unfortunately, this is not possible in this case. With a shorter pivot, the ball-hit fraction on shot “C” reaches 0 before all of the lines can meet:
and with a longer pivot, the CB aiming line will be closer to parallel to the the original alignment line, creating smaller cut angles, but the lines still can’t all meet at one point:
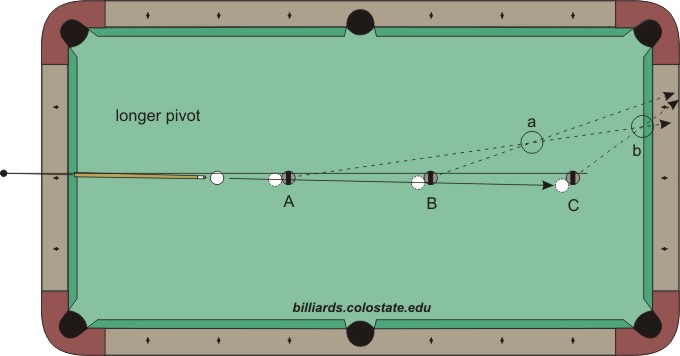
and with a true parallel shift (infinite pivot length), all of the cut angles would be identical and the OB lines would be exactly parallel (i.e., they wouldn’t intersect at all).
Here’s another way to explain the impact of the limited lines of aim created by a limited number of initial alignments and pivot directions, applied again to the following three shots:
Instead of just the three shots (A, B, and C), consider 15 shots equally spaced between shots A and C. Let’s use Stan’s version of CTE for this example. According to the system procedure, alignment and pivot choices change with shot cut angle. As the cut angle changes in small increments between shots A and C, the choices for alignment and pivot change at certain points in the range. For example, on Stan’s DVD, he suggests an inside 1/8 OB alignment with with an inside cue tip position (for a left-to-right pivot) for shot “A,” an inside 1/4 OB alignment (point A) with an inside cue tip position (for a 1/2-tip left-to-right pivot) for Shot “B,” and a center OB alignment (point B) with an inside cue tip position (for a 1/2-tip left-to-right pivot) for Shot “C.” At each point in the range of 15 shots where the alignment and/or pivots change, because neighboring shots of the group of 15 are so close together, different alignments and pivots would need to produce the same cut angle (e.g., to pocket the ball with an angle in between both choices). Also, the alignment and pivot will not change for certain ranges of shots within the 15. Therefore, a single alignment and pivot would need to create a range of cut angles. However, if you follow the procedure accurately and consistently for a selected alignment and pivot, with a given CB-OB distance and bridge length, assuming a rigid and fixed bridge, the procedure would result in the exact same cut angle every time (without conscious or subconscious “adjustments”). Obviously, this particular cut angle will work for some of the shots in the indicated range, and it won’t work for others (depending on the distance to and size of the pocket), because every shot in the indicated range requires a different cut angle (assuming center-pocket aiming).
Now, does that mean you can’t make CTE work for all shots at a table? Absolutely not. Four ways to make it work are summarized above. This is where “visual intelligence,” “adjustment,” “experience-based intuition,” and “feel” come into play. And with enough practice, a person might be able to learn to apply one or more of the four techniques suggested, and do so naturally and even subconsciously … to where they might not even know they are doing them.
Here’s another useful experiment and drill related to Version 4 of CTE:
- Place the CB on the head spot, and place the OB 2 feet in front of the CB on the table centerline.
- Ignoring the rails and pockets for now, cut the OB to the left using each of the alignments and pivots suggested by Stan’s manual-pivot version of CTE, placing the CB and OB is the same positions for every shot. The six possible align/pivot choices for a cut to the left are:
- A-right
- A-left
- B-right
- B-left
- 1/8-right
- 1/8-left
from AtLarge (in AZB post):
After DVD1, Stan adjusted the visuals to include C (without a coupled CTE visual) for left cuts and A for right cuts, both with left or right pivots. So it would now be 8 instead of 6 in each direction. But A-left and B-right are now considered to produce the same result for left cuts.
After each alignment and pivot, shoot the CB into the OB and note or mark the direction the OB heads on the table (maybe by marking where the OB hits the nearest cushion). Even though different people might see and execute the visuals, alignments, and pivots differently, a single person (if careful and consistent) should send the OB in a repeatable direction for each of the 6 choices (with a different angle resulting from each of the 6 shots). One can try these 6 shots multiple times to test and verify their consistency. This actually might be a good drill for dedicated CTE users out there.
- Now shoot the same shot again multiple times, this time sending the OB in a wide range of directions at and in between each of the 6 directions from step 2. If you desire, place a spare ball on the target cushion, and move it from one shot to the next, to simulate different pocket positions.
Alternatively, move the CB and OB together into different positions with the OB along an arc a fixed-distance from the corner pocket, always placing the CB 2 feet above the OB with the line through the ball centers parallel to the table centerline (and side rails). At each position, attempt to pot the OB in the corner pocket. Each of these shots will have the exact same CB-OB relationship and the exact same distance to the pocket. The only thing different will be the cut angle required to pocket the ball in the corner. Vary this angle, moving along the arc in both directions to cover the widest possible range of cut angles (from close to straight-in along the side rail adjacent to the corner, to the thinnest cut you can get with the balls close to the side rail across from the corner). - For each angle or range of angles in step 3 (using either approach), explain the method used to decide which of the 6 align/pivot choices is used in each case. Also, for the directions that are between the 6 angles determined in step 2, clearly explain what is done differently during your pre-shot routine to create angles different from the original 6 directions.
This experiment is the easiest way to fully understand how CTE can actually work for the people who use it effectively over a wide range of shots.
BOTTOM LINE OF THE ANALYSIS : Any align-and-pivot system like CTE requires changes in alignment and/or effective pivot length as the cut angle and shot distance change.
DAM is still a much simpler approach to basic center-ball aiming than any pivot-based system; although, like anything, it does requires practice. Regardless of which “aiming system” you use (even if you just “see the angle”), you still need to practice to develop and improve your “visual intelligence” and consistency, and you need to actually focus on aiming the shot. It also helps to have an effective and consistent pre-shot routine. Many aiming systems can help some people do this (for more info, see benefits of “aiming systems”). Also, when you use sidespin, you need to compensate your aim to account for squirt, swerve, and throw.
Dr. Dave keeps this site commercial free, with no ads. If you appreciate the free resources, please consider making a one-time or monthly donation to show your support: