How does the shaft-edge (or edge-of-ferrule) aiming system work?
See the quoted messages (with illustrations) below. Here’s an explanation of a variation described by Shane VanBoening: shaft-edge-to-object-ball-edge system.
You can also use the entire cue to help you aim all types of shots.
from 3andstop:
It’s pretty self explanatory. If I’m cutting my shot to the left, I use the left edge of my shaft, if my shot is straight with no angle, I use the center of my tip, and if I’m cutting to the right, I use the right edge of my shaft. No matter, I stroke that part of the shaft directly into the contact point on the object ball. If I must apply any english (sidespin) I merely move my stick parallel to my original aim and I still shoot that part of the stick into the contact point on the object ball. No twisting or pivoting or anything else.
from coloartist:
from Patrick Johnson:
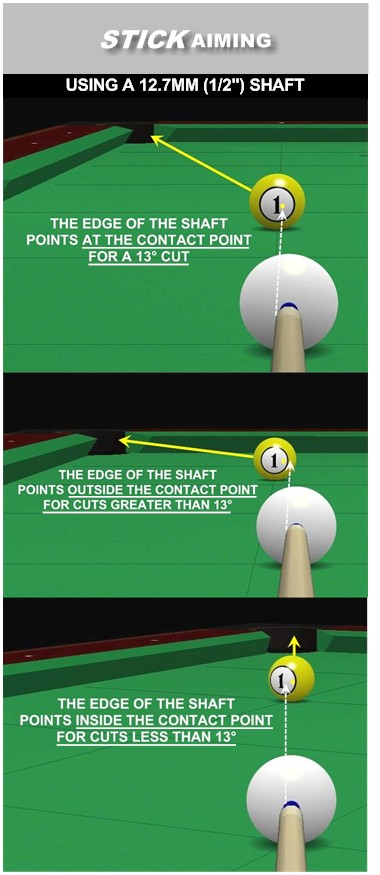
Because of its fixed width, the edge of a centered shaft points directly at the OB contact point for only one cut angle. For a 12.7mm shaft like the one in the pictures below this “Stick Aiming cut angle” is 13°. The “Stick Aiming cut angle” for smaller shafts is a smaller angle and for larger shafts it’s a larger angle.
Stick Aiming is done by learning how the edge of your stick lines up compared to the OB contact point for different cut angles and recreating the correct alignment from memory for each shot that comes up. The edge of the stick almost never (except for the shaft’s one Stick Aiming cut angle) lines up exactly with the OB contact point, but using it as a fixed comparison for any cut angle can be a helpful memory aid.
Like other “reference” systems, Stick Aiming can be used with varying° of awareness of how it functions:
– “consciously”, with real time awareness of estimations being made
– “subconsciously”, with abstract understanding that estimations are made
– “unconsciously”, with no awareness that estimations are made (believing the method is “exact” for all shots)
from dr_dave:
By aligning your vision center with the inner edge of the shaft (instead of the through the center of the shaft), you’re perception of the line through the contact point might indirectly cause you to align your cue to aim slightly outside of the contact point (which is required to make a cut shot). If you don’t aim the center of the cue outside of the desired contact point, you will undercut the shot:
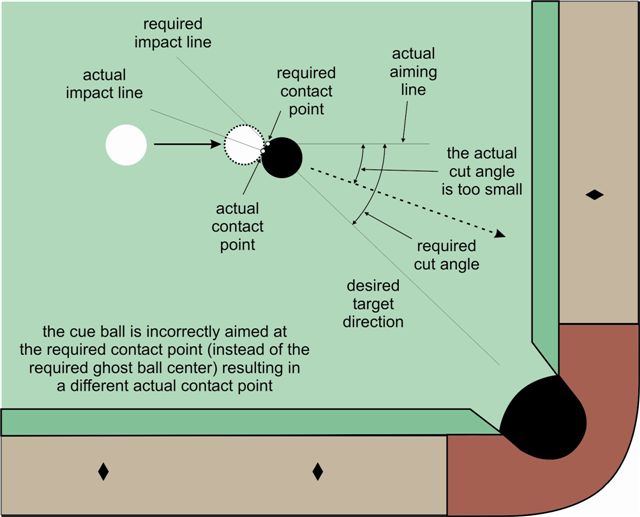
Squirt actually makes the situation worse by deflecting the CB away from the necessary ghost-ball position, but swerve helps counteract this. Also, outside english helps limit CIT, and with small cut angles, it could even create a small amount of SIT to help.
This method will obviously work only for shots at certain angles, speeds, distances, and cue elevations; and the cue’s squirt also has an effect. However, “aiming systems” like this can still be helpful and effective for some people, because they offer many potential benefits (see aiming system benefits).
from AtLarge:
First, I’ll state what I heard Mr. Mullen say to define the method:
1. Find the intended contact point on the object ball (OB).
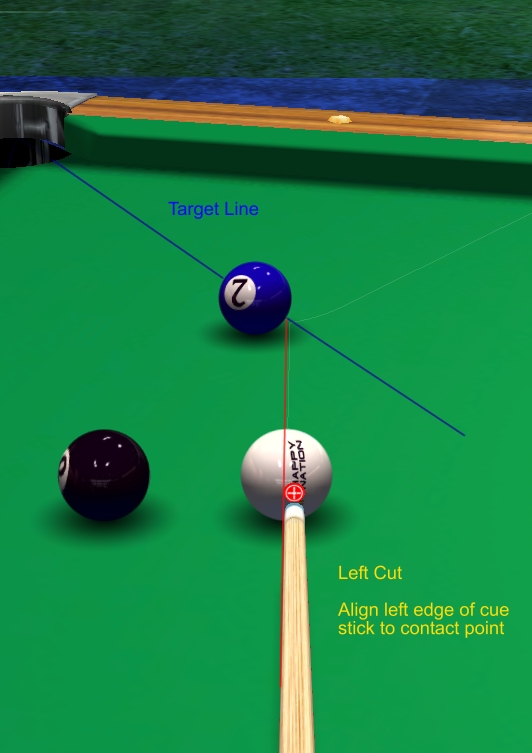
2.a. For a cut shot to the left with no english, point the cue stick through the center of the cue ball (CB) with the left edge of the ferrule aimed at the contact point.
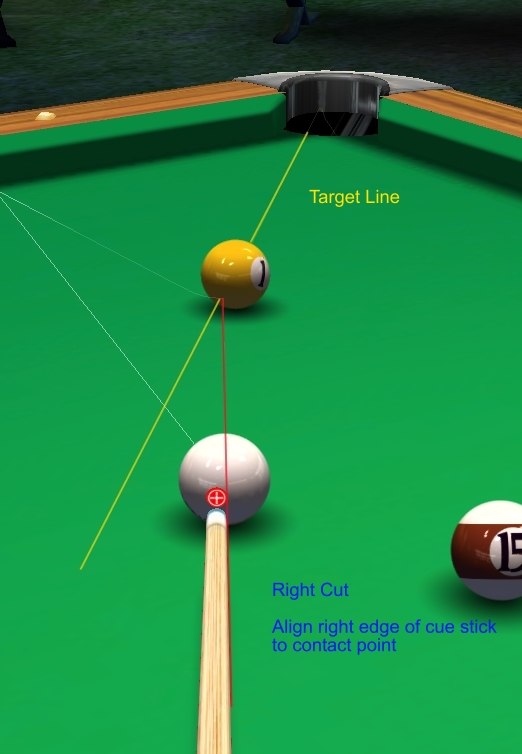
2.b. For a cut shot to the right with no english, point the cue stick through the center of the CB with the right edge of the ferrule aimed at the contact point.
3. Stroke straight back and through on this aiming line.
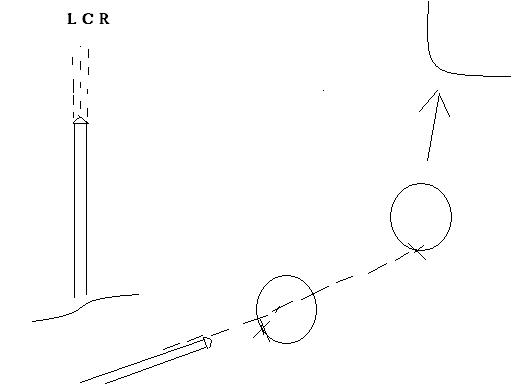
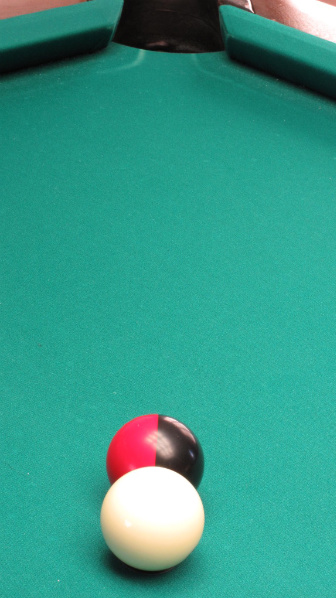
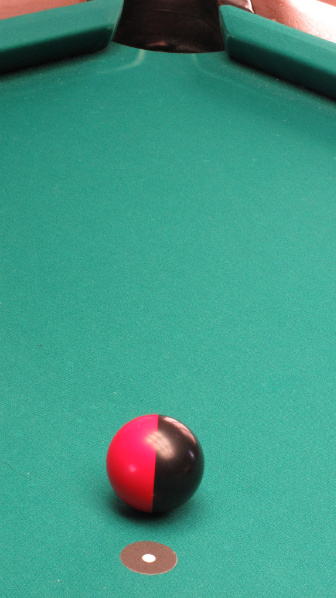
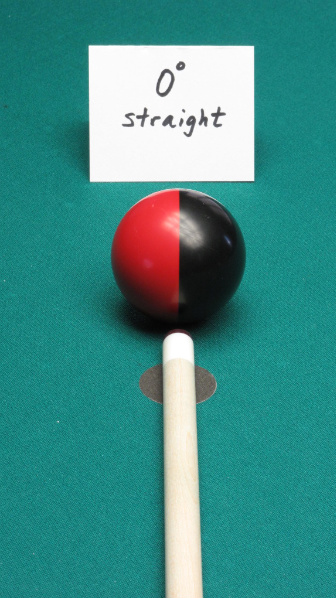
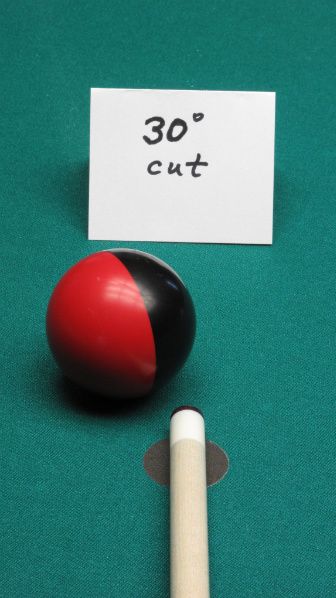
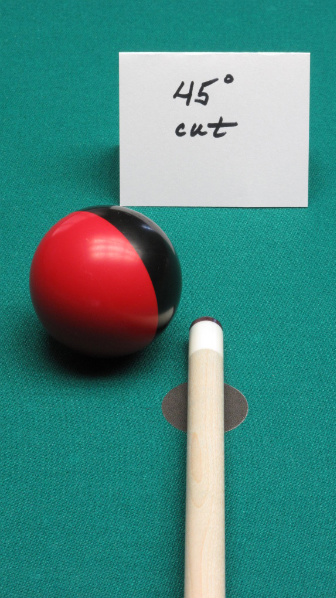
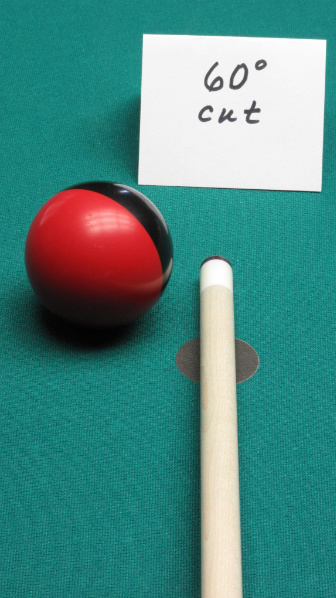
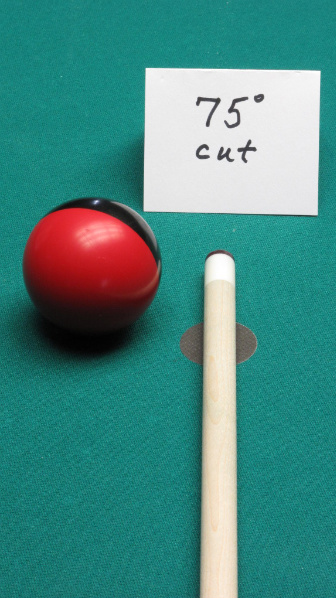
What follows are eight pictures. I used a half-black/half-red ball to represent the OB. It has a clear line separating the two colors. I aligned this separation line vertically and pointing at a corner pocket. I placed this OB frozen to a CB that is on the head spot. So the necessary contact point (ignoring cut-induced throw) is on the equator of the OB on that vertical line where red meets black. The eight pictures below are the following (all cut shots are to the left):
Picture #1. The CB on the spot and the OB frozen to it, with the line of centers pointed at a corner pocket.
Picture #2. The CB removed and the OB left in place. To make the shot without english and ignoring throw, the CB must pass over the center of the white dot in the middle of the black spot (i.e., through the center of the ghost ball).
Pictures #3 through #8. The cue stick placed across the center of the spot, i.e., on the proper line of aim, to make shots at 15° intervals: 0, 15, 30, 45, 60, and 75°.
Here is what one can observe from the pictures:
1. For a straight shot, the edge of the cue stick needs to point to one side or the other of the contact point, not at it. So the Mullen Method is not accurate for straight shots. [But if the shot is a real short one, pocket slop may be sufficient to absorb the angled hit that would result from using the Mullen Method.]
2. For a 15° cut, using the cue stick in the pictures, the shot is pretty much “right on,” i.e., the left edge of the ferrule is in the same vertical plane as the contact point, and the shot would undoubtedly be pocketed.
3. For a 30° cut (half-ball shot), the left edge of the ferrule in the picture is pointing to some point on the OB, but it is to the right (outside) of the contact point. So, using the Mullen Method, if you aimed the left side of the ferrule at the contact point, you would under-cut the shot. [The shot might still “go” if the OB is close enough to the pocket, but probably not if it is a long distance from the pocket.]
4. For properly aimed cut shots of 45, 60, and 75°, the cue stick points entirely outside the right edge of the OB. Using the Mullen Method on these angles would drastically under-cut the OB.
My conclusion, then, is that the Mullen Method, if followed literally and exactly, is really “right on” (to the center of the pocket) for just one cut angle. For the stick I was using (13mm ferrule), that angle was approximately 15°. However, it is approximately “on” for some small range of angles (somewhere greater than zero and less than 30 with my stick), and may pocket many of these shots because of pocket slop. The method may serve as a good approximation method within that range of shots. It may also serve as a good starting point for the player to make further refinements of the aim.

from Bob Jewett:
In the video, the system is described as always aiming the edge of the shaft at the contact point on the object ball. According to the system, if the edge of the shaft were aimed at the edge of the object ball, you would get a 90° cut. That’s clearly very, very wrong. The system has large errors for nearly all cut angles, but the errors for thin cuts are enormous. This is pretty simple geometry.
But the system is not based on geometry. The system gets you to pay attention to the contact point — which is good — and makes you pay attention to stick alignment — which is good. With practice, the system will give you some kind of aiming framework. The system might be described as a perceptual or psychological system, but it is not a geometrically accurate system.
Whether the system will be helpful to any particular person depends on that person and how they apply it. Personally, because I can see the gross geometric errors in the system, I could never trust it.
Dr. Dave keeps this site commercial free, with no ads. If you appreciate the free resources, please consider making a one-time or monthly donation to show your support: