What is a back cut and why is it tougher than a regular cut?
A back cut is a cut shot where the cue ball is shot well away from the target pocket, for example, when the cue ball is much closer to the target pocket rail than the object ball (i.e., where you’re cutting the OB back toward the rail the cue is over). These shots can be more difficult than cut shots looking toward a pocket because the required cut angle can appear larger than it actually is, because you are looking away from the pocket. As a result, most people tend to overcut back cuts, hitting them too thin. For more info, see shot #6 in VEPS-I. Also, with back cuts, because you are looking away from the near rail adjacent to the pocket, the visual cues for the pocket location are not as clear as with non-back-cuts (where you are looking toward both rails adjacent to the pocket, helping to provide better visualization of the pocket location).
With back cuts (as with all cuts), it is important to aim while standing, following a consistent pre-shot routine, to judge the amount of cut needed before getting down on the shot. And then trust your visualization when down on the shot, even if the cut doesn’t look thin enough (due to the lack of a clear visual cues).
A back cut up to (and even more than) 90° is possible with the help of outside english (OE) . Diagram 2 in “Throw – Part VI: inside/outside english” (BD, January, 2007) shows how much OE is necessary for “gearing” OE (resulting in no throw). For a 90° cut, 80% english is “gearing,” so to throw the ball in the SIT direction with a very thin cut, you need more than 80% english. For more info, see:
- HSV B.33 – Outside english gearing, and cut and spin-induced throw
- NV B.86 – Cut-induced throw (CIT) and spin-induced throw (SIT), from VEPS IV
- HSV A.142 – Vernon Elliott cross-side bank with chalk on the object ball to increase throw and spin transfer
from Patrick Johnson (in AZB post):
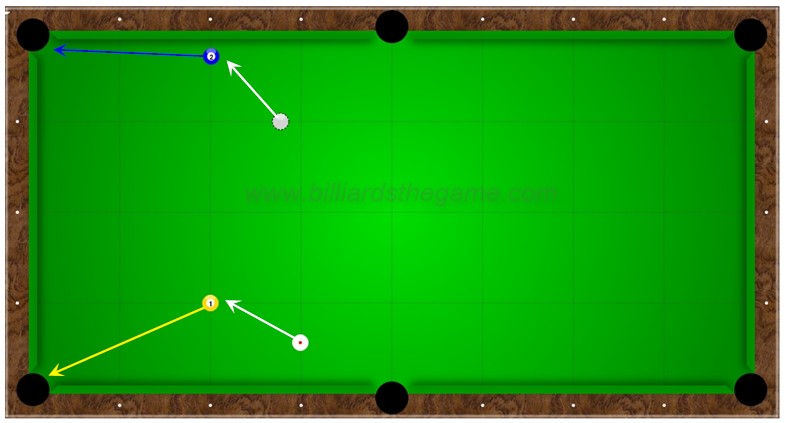
[In the diagram below, the 1-ball is a back cut. The 2 ball isn’t]. The only difference is that the back cut is shooting away from the “visual cue” rail and the other is shooting toward it.
[In the diagram below, both shots are being shot into a “blind pocket,” and both shots can be considered back cuts.]

When we shoot back cuts we’re looking away from some important visual cues, namely the pocket and the rails that point to it. We learned to use these cues to help us see the OB-to-pocket line and find the contact point/cut angle without all the walking around (the usual reason for innovation). But we learned them subliminally, so we don’t notice that we’re using them and don’t know what’s wrong when they’re gone.
Once we do know what’s wrong, the simple solution is obvious: revert to walking around and sighting the OB-to-pocket line as we did before learning to use the visual cues (or resort to the stick-pivot method or any other “mechanical” method to get a fix on the contact point/cut angle).
AIMING TIP:
The main difference between backcuts and other cuts is that there’s no nearby rail behind the OB to show you the direction to the pocket. So a useful trick for aiming backcuts is to “replace” the rail by imagining one right behind the OB pointing to the pocket. Sounds a little nutty, but this often helps to see where to hit the OB. It even helps on non-backcuts where the OB is farther from the rail (this is why OBs in the middle of the table can be harder to aim).
The rail behind the OB is an important visual “cue” – I find OBs on or near the rail much easier to aim.
Dr. Dave keeps this site commercial free, with no ads. If you appreciate the free resources, please consider making a one-time or monthly donation to show your support: