What is the 90° rule?
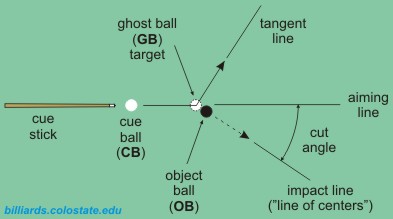
The 90° rule states that for a stun shot, where the CB has no top or bottom spin at impact with the OB, the CB and OB separate at 90°, regardless of the cut angle (except for a straight-in shot, in which case the CB stops in place). In other words, with a stun shot, the CB heads and persists along the tangent line direction, which is perpendicular to the line of centers (the line between the center of the ghost ball and OB).
The following diagrams illustrate the 90° separation angle between the CB and OB and how the tangent-line direction relates to other important CB position control reference lines.


Here’s a convenient 1-page summary resource page summarizing all of the important points of the 90° rule, and here’s a video demonstration:
Here are several easy ways to visualize the tangent line:
Here are some other relevant video demonstrations:
- NV 3.4 – 90° rule with various cut angles
- NV 3.5 – Using your hand to visualize the 90° rule impact and tangent lines
- NV 3.6 – Stop shot
- NV 3.7 – Using the 90° rule to check for and prevent a scratch
- NV 4.1 – Stun shot
Here’s a good drill for practicing stun shots: stop/follow/draw drill.
For more info, see “The 90° rule: Part I – the basics” (BD, January, 2004) and where the CB goes for different cases.
Concerning friction and english effects, see the following instructional articles:
- “90° and 30° Rule Follow-up – Part II: speed effects” (BD, March, 2005)
- “90° and 30° Rule Follow-up – Part III: inelasticity and friction effects” (BD, April, 2005).
- “90° and 30° Rule Follow-up – Part IV: english effects” (BD, May, 2005).
- “90° and 30° Rule Follow-up – Part V: the final chapter” (BD, June, 2005).
Another 90° rule deals with how “good action” draw is defined with the three-times-the-angle system.
from John Matranga (“tangent-line fingers” visualization technique shared via e-mail):
Here’s another method of assisting billiards players to predict cue ball tangent-line direction.
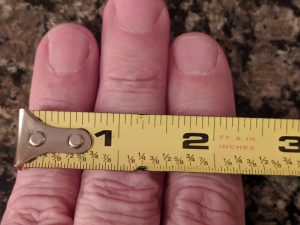
It involves placing the three middle fingers of one hand on the table along the tangent line, perpendicular to the object ball’s projected travel to the pocket. Most men’s fingers are similarly sized with respect to the width of their ring/middle/pointer fingers when placed firmly together and measured from the outside edges of the ring and pointer fingers. This measurement is typically the width of a billiard ball or 2.25 inches (see the photo below). There are exceptions and variations, but I believe the majority of billiards players measure 2.25 inches somewhere between their fingertips and their second knuckles.

This 2.25 inch measurement is important because it will show the projected path of the cue ball when hit as a stun shot. You get a sense where the entire cue ball will travel and not just the center of the cue ball. One can see where the outside “edges” of the cue ball should travel.
This ability to see both edges of the cue ball path is often important when the object ball is in close proximity to other billiard balls on the table. It should allow the player to visualize and predict whether or how much of the next balls will be struck.
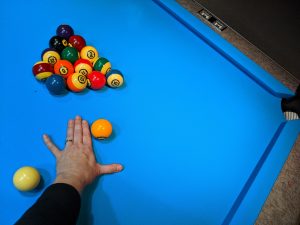
In the photo below, a stun shot on the 1 ball will send the cue ball squarely into the 13 ball to break up the rack. My middle finger points directly at the center of the object ball (the 13) along the tangent line.

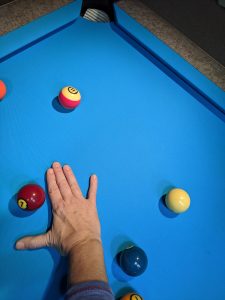
In the photo below, a stun shot on the 7 ball will send the cue ball between the 11 and 5 balls. My three fingers clearly point to a path which will miss both the 11 and 5 before hitting the short rail. Of course, the player may want to use a bit of draw to bump the 11 ball or a modicum of top spin to contact the 5 ball. Alternately, one may cheat the pocket to achieve similar results, but the point is the shooter may see the path the cue ball should take if the cue ball is properly struck.

Dr. Dave keeps this site commercial free, with no ads. If you appreciate the free resources, please consider making a one-time or monthly donation to show your support:
