Joe Waldron
January 2009
Ted Brown (circa 1960) published a 38 page book titled “Wagon Wheel System: Secrets of fine position play” that describes an excellent way to learn cue ball control. Later, Joe Villalpando (2008) showed a variation of Brown’s system that assists the player to learn cue ball control by using a specific placement of the object ball and cue ball relative to the diamonds. The present discussion is a third refinement that can be used to guide your practice. The basic layout is shown in Photo One.
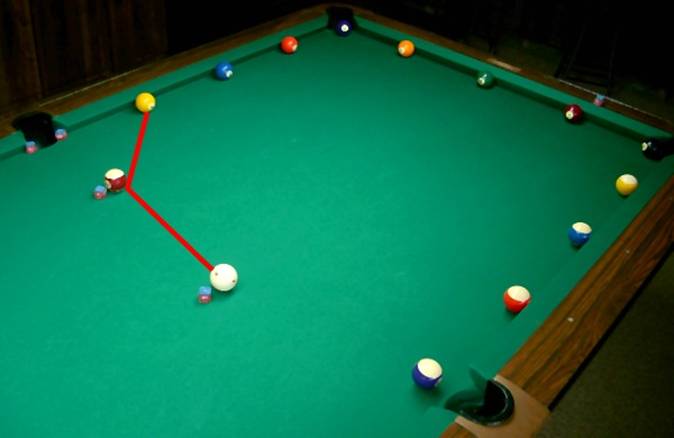
Photo One. The revised Wagon Wheel drill.
To learn to control the cue ball, begin with a standard set of shots. In this case the object ball (15-Ball) is placed in the center of the table one diamond away from the center pocket. The 15-Ball and the 5-Ball are parallel to the long rail. A piece of chalk is placed next to the 15-Ball. This allows the player to easily replace the object ball for the next shot.
It is important that the object ball is one diamond away from the pocket. You are learning to move the cue ball by one diamond increments and the original object ball placement is the reference point.
The cue ball is placed in the center of the table lined up with the left side of the center pocket point as shown on the photograph. A piece of chalk is used to mark this place.
The 1-Ball is the target position where the cue ball will arrive after pocketing the 15-Ball. The 1-Ball is placed opposite the diamond as shown in the photograph.
Your first task is to pocket the 15-Ball and just touch the 1-Ball. No English is to be used and the player should not “cheat” the pocket: The 15-Ball should be played into the back of the pocket without touching either side of the pocket as it enters. To make sure you do not cheat the pocket a piece of chalk is placed next to each pocket point. If the 15-Ball touches either piece of chalk as it enters the pocket the shot is a miss. This is a difficult drill and will take much practice. The rewards are worth the effort.
To make the 15-Ball and touch the 1-Ball you must determine how far above center and what stroke is needed to move the cue ball one diamond up table after pocketing the 15-Ball. Make this shot two consecutive times before moving to the next shot. The two consecutive hits rule is used to be sure it was not a lucky shot and you prove to yourself that you have discovered the appropriate tip off set and stroke that is needed.
Notice the distance that you must hit the cue ball above center with your normal stroke to obtain this position. There are many ways to keep track of cue tip offset position. Villalpando (2008) and others use a clock system. For present purposes we are not using any English and only the positions above or below center ball are needed. As can be seen in the figure shown below, center ball is the zero position. Hitting the cue ball above center would be a positive number hitting below center is a negative number. It is important to note what part of the cue tip hits the cue ball when estimating these offsets. When the cue ball is struck above center the bottom of the cue tip strikes the cue ball and the offset from center to the hit area must be estimated at this point. In the figure the cue tip is 1.5 tips above center but the striking area is about 1 tip above center because the cue ball and the cue stick have opposite curvatures and you may or not elevate the cue stick.
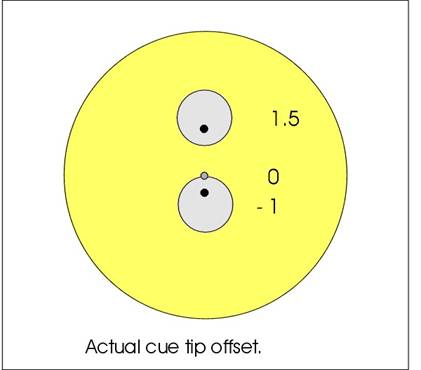
The lower cue tip shown in the figure is placed one cue tip below center but the striking area is about one quarter tip below the center of the cue ball. The exact striking point will change depending upon the angle of approach to the cue ball. If the rear of the stick is raised the actual striking position on the tip is further above the center of the cue tip. The exact place where your cue tip hits the cue ball is something that you learn as you use this drill and carefully observe the cue stick angle of approach.
It is important in this type of practice to use your normal pre-shot routine and stroking procedure for pocketing balls. Approach each shot as a tournament winning ball with all of the appropriate attention to your setup, aim and stroking procedure. The only thing that changes from shot to shot is the amount of power and the cue tip placement for each different shot.
When you can position on the 1-Ball proceed to the next shot on the 2-Ball. Continue in this manner moving by one diamond increments all the way around the table to the opposite side pocket. The goal is to touch each object ball two consecutive times.
When you have completed this drill reverse the process and play around the left side of the table. Move the cue ball to the opposite position off the center pocket point and place the target balls on the rail opposite the diamonds moving around the left side of the table.
Table One below shows fictitious tip offsets when the cue ball is one half ball’s width off a straight in shot (as shown in Photo One). The table also shows the tip offsets when the cue ball is one ball’s width off a straight in shot. The table shows the estimated amount of cue tip offset needed to arrive at each position. Your tip off sets will not be the same because your stroke is different.
As can be see in Table One, with a different angle of approach to the object ball, such as placing the cue ball one ball’s width off a straight in shot, different amounts of tip offset will be needed. You will need to experiment with different amounts of cue ball offset to determine what the different tip offsets will be. There is no exact amount of tip offset that can be predetermined for any particular shot. What is learned in this exercise is the ability to estimate how much of a tip offset and stroke adjustment is needed for any particular shot.
| Shot | ½ CB offset | 1 CB offset |
| 1 | 1 tip | No shot |
| 2 | .75 | 1.5 |
| 3 | .6 | 1 |
| 4 | .2 | .2 |
| 5 | 0 | -.1 |
| 6 | -.2 | -.75 |
| 7 | -.5 | -1 |
| 8 | -.75 | -1.5 |
| 9 | -1.0 | -1.75 |
| 10 | -1.2 | -2 |
| 11 | -1.5 | -2.5 |
| 12 | -2 | -3 |
Table One. Tip offset from center ball for the Wagon Wheel drill from two different cue ball approach angles with the hand placed on the table for a bridge.
There are several interesting aspects of this drill. The placement of the CB, OB and the target ball allow you to learn what it means to move the CB by diamonds from different positions. Shot Five shown in Photo One is a “stun” shot and probably the most important shot to master for any type of pool playing. Shot Six teaches you what it means to draw the CB one diamond over half the table length. Shot Seven teaches what it means to draw two diamonds, etc. It is important to note what tip offset is used for each shot as you learn to move the CB from place to place.
One of the important variations on this practice drill is to first use a bridge with your hand on the table surface and then try the same shot with a rail bridge. You will find that as the cue stick’s angle of approach to the cue ball changes the type of cue ball movement changes. The angle the cue stick approaches the CB is important for subtle control of the CB in follow, stun, and draw shots.
References
Brown, Ted G. (circa 1960) Wagon Wheel System: Secrets of fine position play. Long Beach, CA: American Billiards Library.
Villalpando, Joe (2008). Pool I.Q. Cue ball control, Volume II. Welter Pictures www.pooliq.net