Where will the cue ball go after it hits an object ball?
For a good basic tutorial with demonstrations of most of the stuff below, see the CB control tutorial page first. The following illustration and video also provide good visual summary:
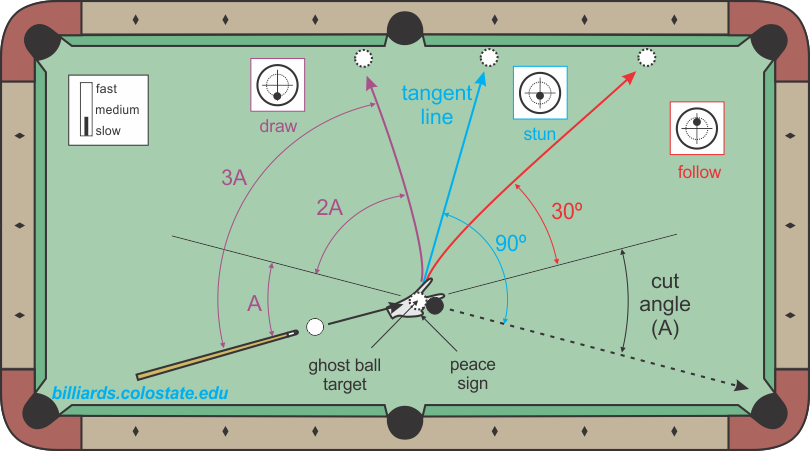
For a stun shot, most people know the right answer: in the tangent line direction, perpendicular to the OB direction. This is the 90° rule.
For a rolling CB, the cue ball changes direction by about 30° for a wide range of cut shots (1/4 to 3/4 ball hit). This is the 30° rule. If you want an easy way to use your hand to accurately visualize the CB direction, use the Dr. Dave peace-sign technique. For hits fuller than 3/4-ball or thinner than a 1/4-ball, see the thin/full hit section below.
For a draw shot with good draw action, and for cut angles smaller than about 40° (i.e., ball-hit fraction greater than about 3/8), the 3-times-the-angle (trisect) system is your answer.
For shots “in between” all of these different cases (i.e., “tweener” shots), see tweener shots.
To see how speed and table conditions affects CB trajectories, see speed effects.
For more info, see Vol. I and Vol. II of the Video Encyclopedia of Pool Shots and:
- NV D.11 – Cue Ball Control Target Pool Drill – from Vol-II of the Billiard University instructional video series
- NV C.5 – Wagon wheel cue ball control drill, from VEPP II
- NV B.73 – Leaving an angle and coming into the line of a shot, from VEPS II
- NV B.74 – Center-of-table position and routes, with the 45° rule, from VEPS II
- NV B.75 – 30° rule natural-angle examples, from VEPS III
- NV B.43 – Cue ball position control stun, roll, and draw reference lines
- NV B.44 – Dr. Dave 30° rule peace-sign hand calibration
- NV B.45 – Cue ball path speed effects
- NV B.46 – Cue ball path scratch avoid, cluster break-out, and billiard (carom) example
- NV B.60 – Mike Page’s Cue Ball Control
- NV B.66 – The 30° rule, from VEPS I
- NV B.67 – The trisect system for draw shots, from VEPS I
- NV B.68 – Tweener cluster breaks, from VEPS I
- “Fundamentals – Part V: CB position control” (BD, January, 2009).
- “Fundamentals – Part VI: CB control examples” (BD, February, 2009).
See also:
- the rail cut shot cue ball control
- Ralph Eckert’s lessons on natural-roll position-play reference lines (part 1, part 2, part 3)
What if the cut is very thin or hit very full?
For roll shots, there are good approximations for the CB deflection angles.
For a fairly full hit, with a ball-hit-fraction greater than 3/4, the CB will deflect about 3-times (closer to 2.5-times) the cut angle:
Another system for approximating carom direction for full hits is the back-of-the-ball aiming system, but it is not as accurate as the 2.5-times-the-angle system.
For a fairly thin hit, with a ball-hit-fraction less than 1/4, the CB will deflect about 70% of the angle between the aiming line and the tangent line:
See “Rolling Cue Ball Deflection Angle Approximations” (BD, November, 2011) for illustrations, examples, and more information.
There are similar rules for draw shots. For more information, see “Draw Shot Cue Ball Directions” (BD, December, 2011).
As with the 30° rule and trisect system, the full-hit and thin-hit rules apply to the final direction of the CB. The actual final path of the CB is shifted down the tangent line with higher speed.
Video demonstrations of these types of shots can be found in Vol. I of the Video Encyclopedia of Pool Shots.
Is there a single rolling-CB system that can predict carom angle for all cut angles?
Yes. It is called the Rolling Carom Angle (RCA) system:
For more information, see: “Rolling Carom Angle Systems” (BD, September, 2021).
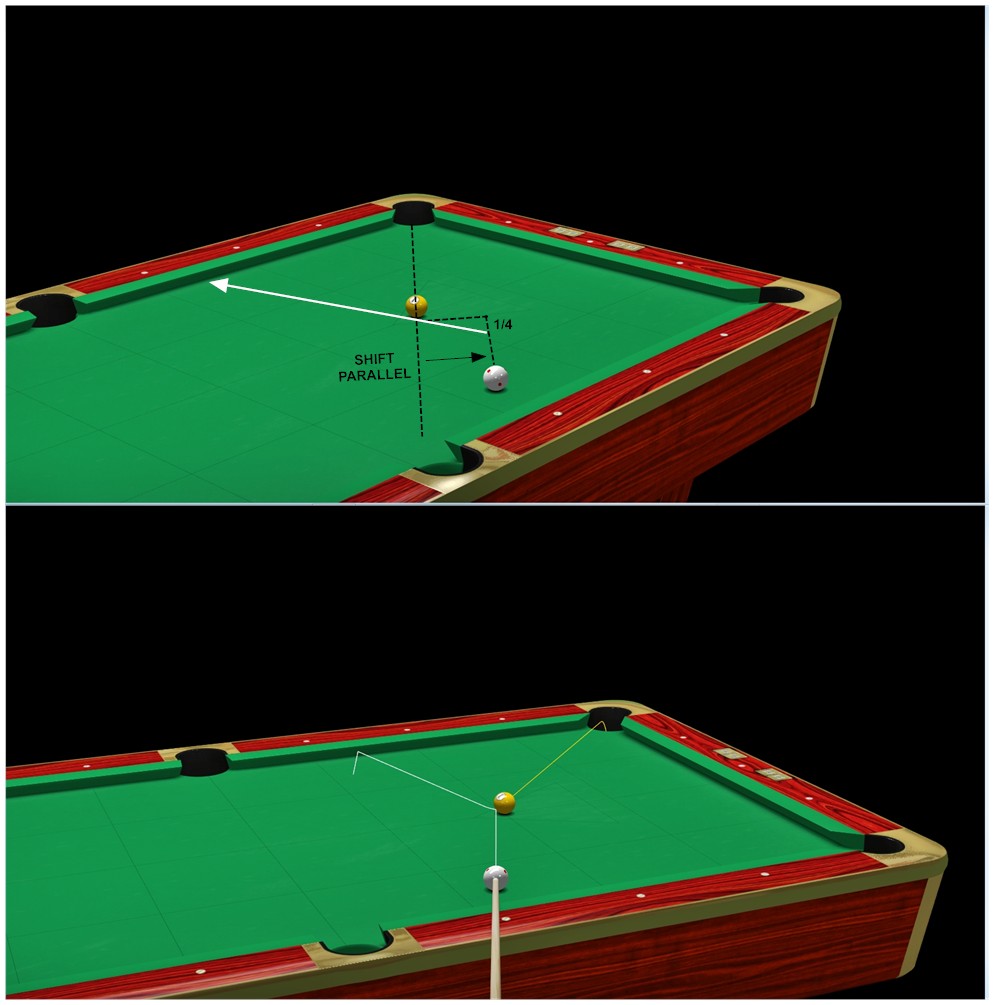
See the quote from Bob Jewett below, which is based on the theoretical approach diagrammed on page 7 in TP A.4. The change in ratio from 2/7 (from TP A.4) to 1/4 is an approximation to make things easier since it is easy to visualize a quarter (half of half). From TP B.24, the ideal length factor is 0.281, which is between 1/4 (0.25) and 1/3 (0.33); so instead of using “about a quarter,” you can use “between a quarter and a third” if you want to be more accurate with the visual approximation.
Any length can be used with the method instead of the cue. For example, you can use the shaft or butt instead, or just use the line between the CB and tangent line (see the quoted image from Pat Johnson below). If using a cue, shaft or butt for the length, you can mark the spot at the exact 0.281 point to be as accurate as possible. And then you won’t need to use any visual approximations. If marking a standard 58″ cue, the 0.281 spot is at 16.3″ (about 2″ above the 1/4 point). And if marking a standard 29″ shaft, the spot is at 8.2″ (about 1″ above the 1/4 point). For more information, see: “Rolling Carom Angle Systems” (BD, September, 2021).
Regardless of which approach you use to visualize the carom angle, you still need to shift the carom line down the tangent line to account for shot speed.
Can I use these systems to aim carom shots with CB in hand?
Yes. With the marked-cue RCA approach, for a given OB direction and desired carom direction, move the butt end along the tangent line until the marked spot points at the carom target, and then place the CB anywhere along the line from the GB to the joint. For a given CB position and desired carom direction, place the joint along the CB-GB line and rotate the butt until the marked spot points at the carom target. Then a line through the butt end and GB gives you the required tangent line for the shot. Aim for a line of centers perpendicular to that.
The peace sign is much easier. It works for all angles between 1/4-ball and 3/4 ball hits. If you want to be accurate, you can adjust your peace sign slightly based on the cut. See the videos on the peace-sign resource page for more info on how to do that.
For hits fuller than 3/4-ball, you can use the 3-times-times-the-angle system in reverse by visualizing 1/3 of the total desired carom angle.
For examples of how to use the peace sign and other techniques to plan ball-in-hand carom shots, see: how to aim carom shots.
from Bob Jewett (in AZB post):
Here is another way to find the direction of the cue ball off the object ball for a rolling cue ball. That’s the sort of shot that you use the peace sign or the 3x angle ideas for. Those methods are restricted to ranges of angles. The following method works for all angles.
In the diagram the 1 ball into the side is set up for about a half-ball example shot. Position 1 of the cue stick is with the stick parallel to the path of the object ball and the tip even with the ghost ball. The rectangle shows those relationships. (Of course if the 1 ball were not going straight across the table, putting the cue stick correctly is much harder.)
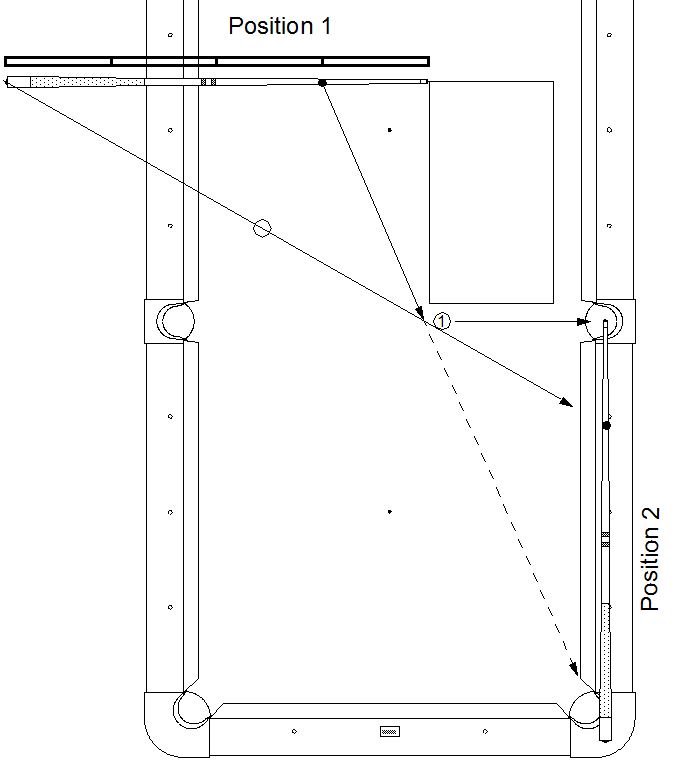
The easy way to get there is to put the cue stick with the tip at the ghost ball along the line of the shot and move it up in parallel. Move it until the bumper, the cue ball and the ghost ball are in a straight line. It is always possible to do this.
If a point on the cue stick 1/4th of the way from the tip is marked (or estimated by halving twice), the line from that point through the ghost ball will give the line of the cue ball off the object ball.
For some shots it easier to use the cue stick in Position 2. In that case it is the 1/4th mark that is lined up with the cue ball and the ghost ball as shown. Now it is the bumper that gives the direction of the cue ball.
This method takes a while to learn. It is always possible to place the cue stick in each of the positions. Note that for each position the tip and butt can only be in one place. The cue stick must be either perpendicular or parallel to the path of the object ball and the tip (or bumper if you turn the cue around) must be even with the ghost ball. The cue stick will rarely be parallel to a cushion — that’s just true in the example shot to make the geometry clearer.
Note that for the Position 2 example, you can use the diamonds because the diamonds run perpendicular to the path of the object ball — very convenient. Since the cue ball is starting out to 1 diamond from the side pocket, after the collision it is deflected three more diamonds down the table.
It might be easier to use a 1/4th spot on the butt rather than the shaft and a suitable mark may already be on your cue stick.
Also, there is nothing magic about the length of the cue stick for this geometry. You could do the same thing with just the length of the shaft. Or, you could use four hand spans.
from Pat Johnson (in AZB post):
from Pat Johnson (in AZB post):
You can measure on either side of the OB, and it can be used in either direction: to find the carom angle for an existing aim line or to find the aim line you need with ball-in-hand.
from Bob Jewett (in AZB post):
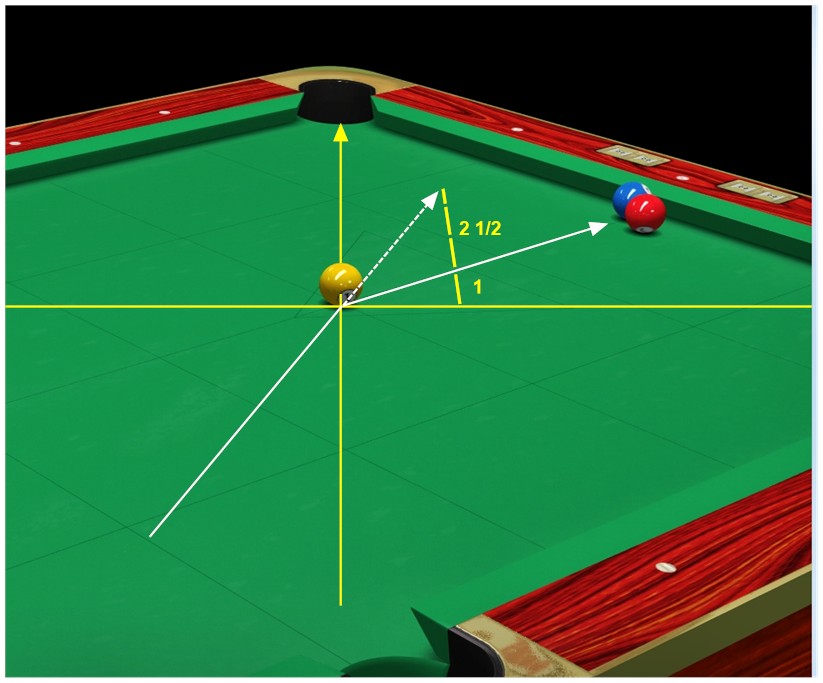
Something very much like PJ’s approach can be used for BIH. Take any convenient point on the cue ball’s side of the shot that is on the line between the carom target and the center of the ghost ball. For example, one that is about a foot from the tangent line. Drop a perpendicular from that point to the tangent line, and note the distance. Come back from the point by about 3 (or 2.5) times the distance. That new point is on the CB line to the ghost ball.
from Neil Murphy (Toronto, Canada) via e-mail:
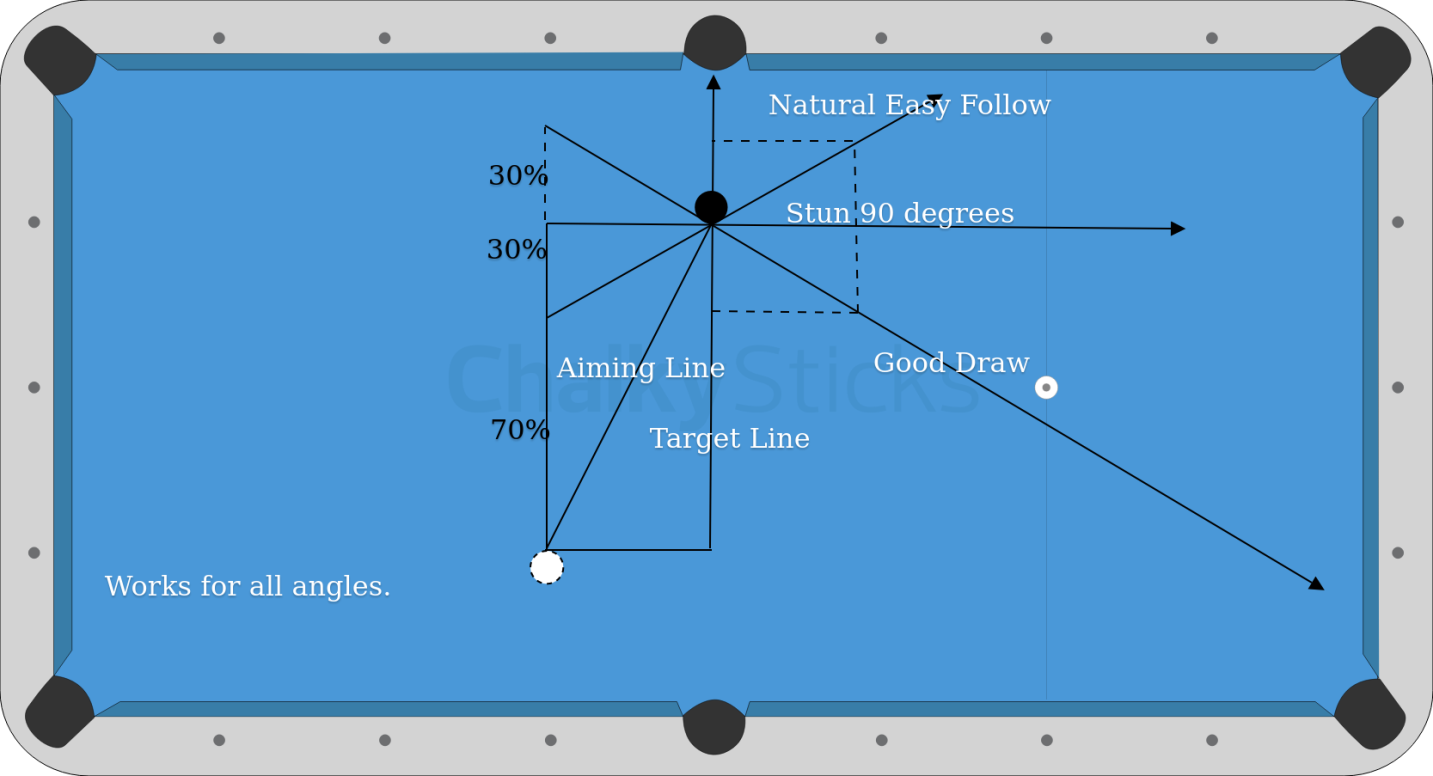
Neil’s Unified CB Control Theory
As my aiming system, I start each shot along the target line of the shot, and mentally create a rectangle between the contact point of the cue ball and the contact point of the object ball (see the diagram below).
I started exploring how to predict where the natural angle of a rolling cue ball would go. I extracted deflection angles from one of your charts in your technical papers and put them into a spread sheet. I calculated where the natural angle would intersect the line below the cue ball, if extended backwards. For all angles from 0-85°, the natural angle extends backwards and cuts the vertical line below the cue ball consistently at the 30% mark.
But what about draw shots? I extracted deflection angles from one of your charts and started playing with the geometry on my spread sheets. What if I extend the draw angle back the same way I did the natural rolling shot? Again the height of the division is near 30% of the total vertical axis! In this case we are closer to a 1/3, but given the greater degree of variability in draw shots, 30% is an excellent estimation and provides better visual symmetry when lining up the shots.
So now we have a system that allows us to accurately predict the cue ball path. By standing perpendicular to the target line, you can see the shots accurately. However, most shots you can get a reasonable estimate facing down the target line as well. It is also possible to view this in other ways. I will sometimes visualize the rectangle extending to the right, and then pick out the 30% point for both draw and follow.
from Jal (from AZB post, which contains additional information):
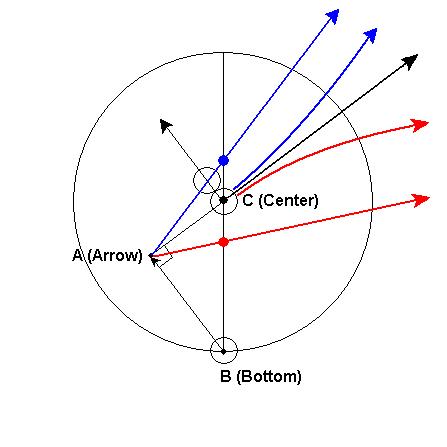
When the balls are close enough to each other and/or you’re hitting hard enough such that the cueball doesn’t lose any significant backspin on the way to the object ball (or gain more topspin), there is a method of determining the cueball’s direction once it reaches natural roll after the collision. I call it the Bottom-Center-Arrow method, or B-C-A for short, in that it’s easy to remember.
Imagine a circle centered on the ghostball with the bottom of the circle running through the center of the cueball. This circle represents the face of the cueball from the shooter’s perspective. To determine the CB’s roll direction after the collision for any vertical offset (no sidespin applied), draw a line from the center of the real cueball parallel to the line of centers between the ghostball and the object ball. This will intersect the tangent line at 90°, call it point A. Thus, we have a triangle with the CB at vertex B (bottom of the circle), the ghostball at C (center of the circle) and point A from which we’ll draw an arrow such that it intersects the vertical axis of the large circle. This yields the CB’s direction once roll sets in, given that vertical tip offset on the face of cueball. Here’s a diagram:
… friction, amongst other things, has an effect on this idealized geometry.
Dr. Dave keeps this site commercial free, with no ads. If you appreciate the free resources, please consider making a one-time or monthly donation to show your support: