How does backhand and front-hand english work?
Backhand english (BHE) and front-hand english (FHE) are aim-and-pivot methods used to adjust one’s aim for squirt and swerve (AKA “cue ball deflection”). The best resource for learning how and when to use BHE, FHE, and parallel english (PE) is the System for Aiming With Sidespin (SAWS).
For other information and illustrations, see “Squirt – Part IV: BHE, FHE, and pivot-length calibration” (BD, November, 2007), “HAPS – Part II: BHE and FHE” (BD, December, 2014), and the aim compensation when using sidespin resource page. For useful quick summaries, see the aiming with sidespin handout and the SAWS BHE/FHE calibration handout.
The phrase “back-hand english” is also sometimes used to refer to a swooping stroke, where the back hand is moved sideways during the forward stroke (see stroke swoop), but here the focus is on aim-and-pivot BHE, where the back hand is moved before the stroke, after lining up the shot for a center-ball hit.
Here’s a good overall video demonstration of BHE and FHE from Vol. II of The Video Encyclopedia of Pool Shots:
And here’s a video from Vol. I of How to Aim Pool Shots (HAPS), showing the basics of how BHE and FHE can be applied:
The most basic form of BHE is with the bridge at the natural pivot length of the shaft. This will totally cancel squirt (CB deflection) for fast-speed and/or short-distance shots, where swerve is not a significant factor. The first video below illustrates this concept, and the 2nd video shows how FHE can be used with BHE to change the effective pivot length:
For most shots with sidespin, swerve is a major factor, in which case the System for Aiming With Sidespin (SAWS), which uses combinations of BHE and FHE, is good approach for compensating your aim over a wide range of shot distances and speeds. Another approach is to just aim by feel or intuition based on countless hours of successful practice and experience, like most top players do. The following video shows how to use SAWS to calibrate yourself for combinations of BHE/FHE. It also includes many examples of interesting game-situation sidespin shot examples:
An alternative to the BHE/FHE approach is to use only BHE with a variable bridge length (instead of adding FHE) to compensate for different combinations of squirt, swerve and throw (e.g., see BHE bridge length adjustment technique and NV A.19). This might not be a good option for LD shafts that have very long natural pivot lengths. Also, many people prefer using the same bridge length on most shots. Also, many people like to adjust their bridge length based on shot speed, especially for power shots (long bridge) and touch shots (short bridge). To adjust for squirt and swerve, bridge length needs to be adjusted based on the distance and speed of the shot. Basically, at slower speeds and greater distances between the CB and the OB, a longer bridge length is required because the “effective squirt” (or squerve) is reduced due to swerve. This will only work with a near level cue, because with an elevated cue, swerve becomes a larger factor and can make “effective squirt” negative. Also, with a follow shot, swerve happens sooner than with a draw shot (of the same cue elevation), giving less effective squirt (squerve), so again a longer pivot length would be necessary. The following videos demonstrate the limitations and difficulties of using BHE over a wide range of shots:
Another approach to compensate aim when using sidespin is to vary cue elevation with shot speed and distance so the swerve exactly cancels squirt. In that case, BHE and FHE aim adjustments are not required. This sounds nice, but it is very difficult to judge the amount of cue elevation needed from one shot to the next, and from one set of conditions to the next. For more information about swerve and the combined effects of squirt and swerve, see the squerve resource page.
Throw is another matter. When using BHE and/or FHE, it is generally recommended that the center-ball aim be adjusted for throw separately. For many shots, no throw compensation is required. However, with stun shots, slow shots close to a 1/2-ball hit, and small-cut-angle shots with sidespin, throw (CIT or SIT) can be significant, and aim must be adjusted. A good summary of the basic things you need to know about throw in your game can be found at the bottom of the throw tutorial page.
The same principles that make pre-stroke BHE an effective method to compensate for squirt also enables automatic stroking-error correction (e.g., from unintentional swoop during the stroke) when one’s bridge length is well matched to the natural pivot length of one’s cue. For short or fast-speed shots, any stroking direction error caused by sideways motion of the back hand during the stroke will be exactly cancelled by squirt (cue ball deflection) resulting in a straight shot. This is particularly helpful with the break shot, where it is difficult to stroke the cue perfectly straight at the high speed used (see break shot technique and equipment advice).
Here are some additional videos dealing with BHE/FHE topics:
- NV A.19 – Colin Colenso’s back-hand-english saga (for squirt compensation)
- NV B.24 – Joe Tucker’s squirt, swerve, and BHE/FHE combo (part 1, part 2, part 3)
- NV B.58 – Mike Page’s BHE pivot length demonstration
Why should I learn BHE and FHE if this isn’t how the pros aim shots with english?
If you have put in as much practice time as a pro, BHE/FHE is not necessary, because you will instinctively know the necessary line on which to place the cue to compensate for squirt, swerve, and throw on every type of shot (at various distances, angles, amounts and types of spin, and speeds).
For people who have not put in the amount of practice time pros have, BHE/FHE can most certainly be beneficial. Over time, if you pay attention to how you aim the cue for different types of shots (using BHE/FHE), you will eventually build you own pro-like intuition.
How come BHE doesn’t work when I bridge on the rail and the CB is close to the rail?
When your bridge hand is on the rail, several things can go wrong with BHE. First of all, your bridge length might be too short, resulting in too much aim correction in the squirt direction. To compensate for this, you can do a pivot with your standard bridge length first, holding the cue in the air, and then move your bridge hand up to the rail (while keeping the cue still).
Also, the cue might be more elevated than a typical near-level-cue shot, which can result in more swerve than expected. You can adjust for this by adding more FHE (and less BHE) than you would otherwise.
The alternative to all of this is to just practice these shots a lot and learn how to aim them intuitively. That’s what top players do.
from Patrick Johnson (in AZB post):
from dr_dave:
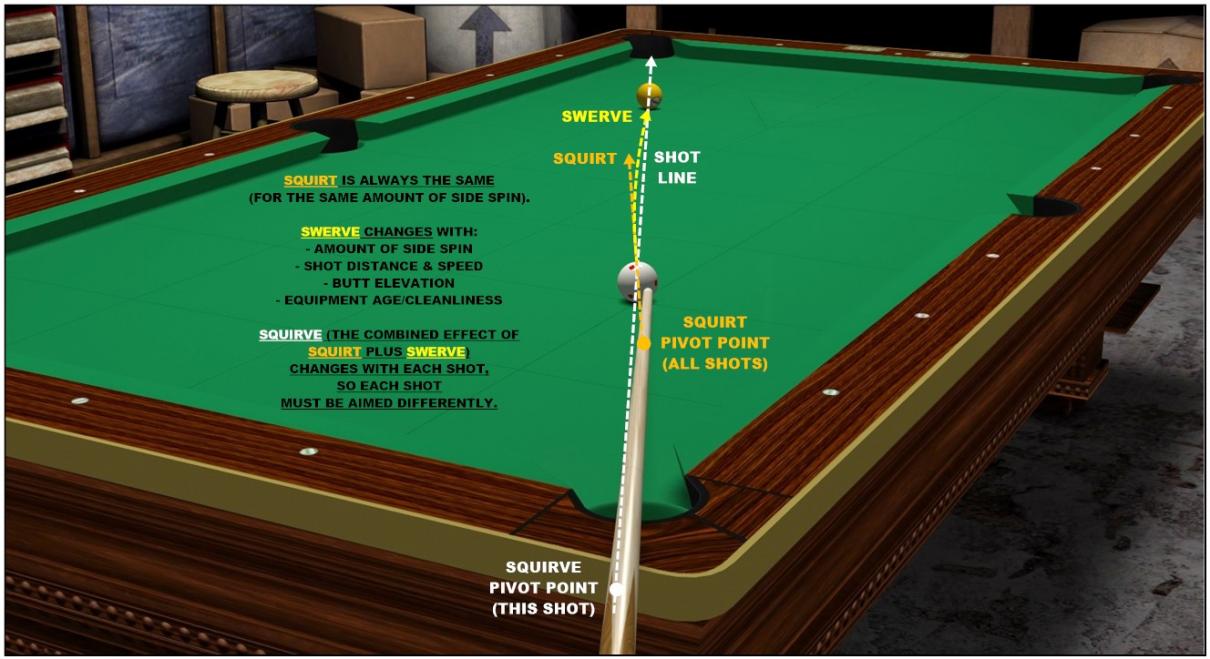
See the diagram above that shows how the effective pivot point for aim compensation (the “squerve or squirve pivot point”) is different from the natural pivot point (the “squirt pivot point”) for the shaft.
Based on the diagram, to use pure FHE, you would first align the cue center-ball along the desired shot line, with your grip at the squerve pivot point. Then you would shift your bridge hand sideways (while keeping your grip hand fixed at the squerve pivot point) to place the tip for the desired amount of sidespin. Then you would stroke straight along this new alignment. This will correctly compensate for squirt and swerve and send the CB in the desired shot-line direction.
To use pure BHE, you would first align the cue center-ball along the desired shot line, with your bridge at the squerve pivot point. Then you would shift your grip hand sideways (while keeping the bridge position fixed at the squerve pivot point) to pivot the cue to the desired amount of sidespin. Then you would stroke straight along this new alignment. This will correctly compensate for squirt and swerve and send the CB in the desired shot-line direction. An alternative to a pre-stroke BHE pivot is to use a swoop stroke (with the pivot occurring during the stroke), which would still send the CB in the same direction (unless the swoop motion is really exaggerated).
For this particular shot, with the effective pivot point (“squerve pivot point”) as diagrammed, it might not be easy to do either of these. That’s where a combination of BHE and FHE becomes useful, as demonstrated in the videos and articles on the System for Aiming With Sidespin (SAWS) resource page.
An alternative to these approaches is to do what most pros and top players do: Just place the cue along the necessary direction, away from the desired shot line, to intuitively compensate for squirt and swerve, guided by countless hours of practice and successful experience, and then stroke straight to send the CB in the desired shot-line direction.
from Colin Colenso (in AZB post):
The main power of BHE, in my opinion, is for shots where swerve is not highly significant, where we can forget about having to adjust our aim for squirt (CB deflection). Shots with significant english, that had previously troubled us, become as easy as making the same shot with straight follow.
That said, there are a few shot types where throw becomes an issue. This is not just a feature of BHE, these same shots are problematic for any aiming method, requiring significant feel and/or experience to adjust to.
A brief summary of these problem shots include:
1. Slowish sliding (not spinning) CB shots.
2. Slow shots generally.
3. Shots with more than gearing outside english.
4. Fairly straight shots, say 7/8th to full ball with inside or outside english.
If these shots need to be played, you need to adjust the initial aim to compensate, and this requires some knowledge of, or experience with the throw on these shots. Some may choose to apply this aim adjustment by imagining the initial line of aim away from center pocket (my preferred method), or they can change the bridge length such that it directs the CB to the appropriate contact point on the OB.Why Players Often Struggle When They Attempt to Use BHE
1. They may be playing the problem shots listed above without making the proper aim adjustments.
2. It’s a common tendency for the bridge to shift during the pivot. This takes some practice and perhaps getting a few bridge hand cramps until one learns to keep a relaxed still bridge throughout the pivot and stroke.
3. After years of subconscious adjustments or not having developed accurate pre-alignment, their pre-pivot alignment (bridge V positioning) can be inaccurate.
4. Focusing on getting the bridge V to the required pivot distance can distract one’s focus on finding the correct aim line.
5. Players often begin using the wrong pivot length. They might find success with outside english, a common favorite shot of many, and make that shot pretty well using a bridge length actually near their longer SquerveThrow pivot point, detailed above. When they then try using the method on inside english cuts, they will overcut the shots.
6. If a player has had a tendency to aim thick and swipe a little to thin their cuts, they may struggle with implementing good pre-pivot bridge positioning.
7. Some players have tended to avoid use of side, other than gearing, as often as they could and when they have used it, it has tended to be on simpler shots and applied at slowish speeds. BHE shines on firmer shots, often creating 2 and 3 rail routes for position. It may take some time to become familiar with these routes and start using them more in matches. Using BHE just for cinching soft shots and checking the CB up, won’t give the user much satisfaction. Get creative with it, and you’ll begin to discover its potential.
8. Awkward post-pivot Stroking: It can take a while to get used to shifting the body and sometimes the stance to enable a comfortable stroke after pivoting. When the back hand comes toward the body, one can feel cramped, and the stroke can also feel wide and loose when the hand moves away from the body. All I can say is it takes a while to get used to it. I don’t even think about it anymore, my body just seamlessly moves into a position that is the same as for my non-pivoted strokes.
Throw and Throw Adjustments
Here are a list of the major things to be aware of when adjusting aim or bridge length for throw.
1. A sliding CB (stun type shot) has significant thickening throw, especially at slow speeds. Avoid using it on cuts finer than 10° unless applying gearing outside, lots of inside with at least medium speed or hitting it hard.
2. Avoid heavy outside english, especially on softer shots. Try to stay near to the gearing amount, which varies from about 1/8 tip to 1/2 tip from near straight to fine cuts. As the pot gets thinner, you can get away with a little more OE tip offset without diving into the highly variable zone from 1/2 to 1 tip. One shot that is a bit more controllable is hitting very hard with near maximum OE. At high speeds, the thinning throw begins to diminish significantly with wider tip offset. If you must hit heavy outside at lower and medium speeds, practice the aim adjustments, they can be quite large, up to 5 inches per yard of travel on softer shots with about 80% tip offset.
3. On fuller angles 7/8 and thicker, doubling the corner or drawing back with inside english, expect about 2-3 inches thickening throw per yard. This decreases as speed increases, so often, harder is better.
4. The throw for inside english, when used with more than 50% offset on all non-near full angles needs no aim adjustment. Also, when rolling pots in medium speed, getting unintentional inside will not significantly effect the pot angle, but a touch of outside can, so be careful not to swoop to the outside when playing rolling pots.
5. Hard draw and follow will thin the shot a little, if one gets used to aligning their aim as if using medium-firm follow.
BHE bridge length adjustment technique (from Colin Colenso)
It’s little wonder that pros are adept at, and usually rely almost solely upon simply estimating how to align to any shot they want to make using english.
There really has been no other way to learn how to execute english for a wide range of shots. So they learn a huge range of shots by repetition and this gives them the intuitive feel to make, or get close to almost any shot they attempt with varying° of cut angle, speed and tip offset.
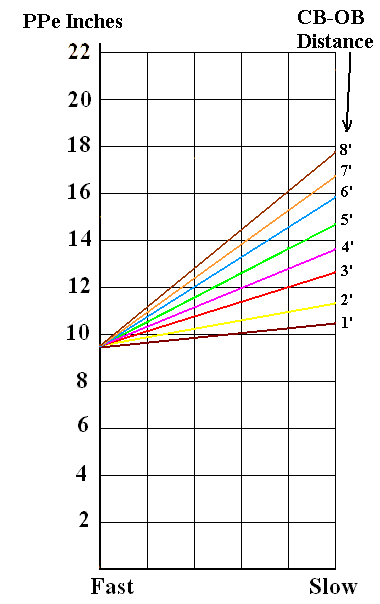
When I first learned about BHE a few years ago I thought it was some instant quick fix. But I soon learned that there were variables that affected the success on many shots quite significantly. These are:1. The effective pivot point changes according to speed and distance traveled. (Swerve is the culprit).
2. The actual contact point required to make shots varies considerably with CB speed, cut angle and type and rate of spin on the CB.
So without knowing how much to adjust for all of these variables, BHE is only useful for a limited range of shots.
[Here is a method, with formulas, that can be used to select a bridge length to compensate for both squirt and swerve, assuming you have already adjusted your aim for any throw effects.]
PPe = PPi + DVK
PPe = required effective pivot point for any shot based on distance and shot speed.
D = Distance from CB to OB (or target) in feet.
V = Velocity Factor where 0 is maximum speed and 4 is slow, or one table length roll including bouncing off one rail (see below).
K = correction factor to account for cloth slickness given by:
K = (PPe* – PPi) / 15
PPi = The Intrinsic Pivot Point. Estimated by finding the effective pivot point for a shot over 5 feet hitting at maximum velocity, such that swerve has insignificant influence on the shot. My cue’s PPi is 9.5 inches. Low squirt cues are 12 to 14 inches.
PPe* = the pivot point required for a 5 foot shot at speed factor 3, which is medium slow, enough to bounce 2 rails back to the original position. This figure will be different for each cue on each table. It brings the slickness variable into the formula.
My preferred cue on my table has PPe* = 13.7 inches. (This could change with humidity changes). It’s PPi is 9.5 inches, so my K value for my cue on my table at the moment is (13.7 – 9.5)/15 = approx 0.28. 0.28 is the adjustment needed at distance 1 foot and speed factor 1. The number 15 is derived from the PPe* being at 5 foot at speed factor 3. 5×3 = 15. PPe* could use any shot as a basis with a different numerator, but 5 foot is a good number because it is about the length of the cue, it can be played with little elevation and it is long and slow enough to provide a decent difference with PPi, hence giving it a reasonable margin of error. PPe* can vary by around 2 inches depending on cloth slickness. It is a number that can be derived pretty accurately within half a dozen hits on a new table.
So for any shot, for me:
PPe = 9.5 + D x V x 0.28
So if I have a shot at speed factor 2 over 4 feet my PPe = 9.5 + 2.24 = approx 11.7 inches.
Below is a chart with PPe’s for the full range of speeds and distances for my cue. You should be able to plug data into this formula and get PPe’s that correspond to those in the chart. Note: The key to making this formula simple was creating the methodology of the speed factor. In the chart below, the speeds are divided into 6 markings, rather than the 5 for speed factors 0-4.
General Speed Factor (V) Rules are:
0 = Max speed, would bounce about 5 rails.
1 = Firm speed, would bounce 4 rails and back to starting position.
2 = Medium speed, would bounce 3 rails and back to starting position.
3 = Slow-Medium speed, would bounce 2 rails and back to starting position.
4 = Slow speed, would bounce 1 rail and back to starting position at center table.
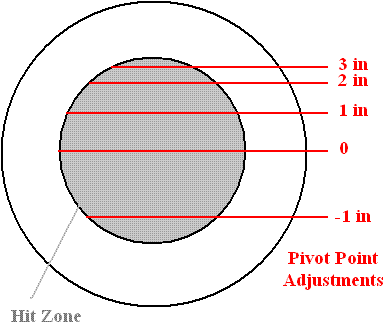
[To compensate for how squerve changes for draw vs. follow shots (for more info, see “Squirt – Part VIII: squerve effects” – BD, March, 2008), we can also make an adjustment to the pivot point based on the height of the cue:]
Based on the above observation I was able, via some testing to establish a pivot point adjustment key depending on the height the cue ball is struck with english.
Strangely enough it seems to work pretty well independent of distance, speed or cue offset. Though this hasn’t been tested comprehensively.
So the total PPe Effective Pivot Point formula, as it has been refined is:
PPe = PPi + DVK + H
H = Height of hit on CB using the numbers given below in the diagram.
(Note: In most practical cases we don’t need to hit higher than the 1 range. Most draw shots fit into the -1 range.
For a low squirt cue, such as a Predator Z, I would increase the numbers in the below chart by about 33%. So they might range from 4 to -1.3. Current information suggests the Predator Z has a natural or intrinsic pivot point of between 12 and 13 inches, compared to a normal shaft which is in the 9 to 9.5 inch range.
Dr. Dave keeps this site commercial free, with no ads. If you appreciate the free resources, please consider making a one-time or monthly donation to show your support: